New Post

Rss

Showing posts with label hellhound. Show all posts
Saturday, 30 July 2016
183 - Sandpaper and Continual Punishment - H47 Artemia Hellhound: Part 3

183 - Sandpaper and Continual Punishment - H47 Artemia Hellhound: Part 3

I had a bit of spare time so continued with a tiny bit of progress on the Hellhound. In case you've missed the start of this, take a look at Part 1 & Part 2

The promethium tank has been glued in place and only required a small amount of filing on the bottom in order to make it sit flat. The track guards were also tidied up and glued in place.

The green stuff filling was given a quick going over with some fine sandpaper to remove the worst of the rough finish. I didn't spend ages on sanding so hopefully that won't come back to bite me later on. The turret is still loose and will not be glue in place - though I may magnetise the guide peg. I've still got to tackle that wonky barrel as well. Some careful bending will be required as it seems a bit twisted as well.

Not content with one ForgeWorld model to deal with, I bought another one. 

This time round though it's a discontinued Vanaheim Pattern Griffon Mortar. Not a bad find and still a cool looking model.

The Chimera base had been put together and the only resin that has been attached is the base plate/side thing. My only concern is the alignment as the resin isn't level with the inner parts of the Chimera which could make adding the gun shield tricky. Has anyone built one of these before and could offer tips?

Thanks for reading.
Thursday, 28 July 2016
182 - Glue and Green Stuff - H47 Artemia Hellhound: Part 2

182 - Glue and Green Stuff - H47 Artemia Hellhound: Part 2

I knew that putting the Hellhound back together was going to be a bit of a pain - see part 1 for more info. All of my dryfit tests showed there would be gaps in a lot of places which no amount of filing or cutting would easily get rid off. Instead, it would be a battle with green stuff and superglue.

The underneath of the tank was where some of the biggest issues were. I used superglue to attach everything and had to hold it together for a few minutes as the side sections kept trying to detach themselves from the hull.

Once the super glue had dried, I used some green stuff to try and fill in the rather large gaps. I'm not really sure where the tank has joined properly so I went with filling as much as I could. The biggest gaps were at the rear where the resin section was not as wide as the Chimera base. A bit of green stuff later and most of the gaps were taken care of - though I will have to revisit some.

Things on this side of the tank weren't quite as bad and only required s small amount of filling. There was a chunk missing at the front that was more challenging to fill, but I used the flat edge of my knife and the flat edge of a sculpting tool to get the green stuff as square as possible.

The other side was more difficult and there was a substantial gap between the resin and the track unit. Some of the green stuff fell through the gap and is now rattling around inside the tank which is a tad annoying. I took a bit more care after that and managed to get the gap filled in.

Where the resin top joins to the hull also needed some filling which wasn't too bad. At this point I had run out of mixed up green stuff so didn't completely fill the gap. Once everything has dried/cured I'll gently sand it down to tidy up my attempts.

As I know the clean up will never be amazing, I will cover up some of the issues with some track armour. To get all three pieces to fit right, some modification needs to be done to the medium piece. In the right hand picture there are some faint cuts where the piece will be sawn off.

A little bit of sawing later and I'm left with a flat (ish) edge which will connect nicely to the larger track guard.

A quick mock up using some blu tac to hold everything in place. Obscures the view of the green stuff quite well whilst giving the tank a bit of a more rugged look.

And here is the join. I need to smooth the edge's down to get a better fit before gluing anything in place.

The promethium tank will be attached next and I also need to try and straighten the Inferno Cannon.

Thanks for reading.
Thursday, 21 July 2016
181 - From a Sorry State to Just a State - H47 Artemia Pattern Hellhound : Part 1

181 - From a Sorry State to Just a State - H47 Artemia Pattern Hellhound : Part 1

A few months ago I purchased a built and painted ForgeWorld Artemia Pattern Hellhound off of a well known auction site. The tank had been painted to a decent standard and looked like it wouldn't require much work once I'd stripped the paint.

Here is the Hellhound soon after it's arrival on the desk of untidiness. Not too bad a job but requires a bit more work. There were a few bits that hadn't been put together too well but I managed to gently separate most of them without any major damage. I then grabbed the brown Dettol and a few old tupperware containers and left the model to soak for a few hours. After a bit of scrubbing pretty much all of the paint came off, leaving just a few stubborn areas to deal with, but overall a decent result - or so I thought.....

Turns out the person who put this little flaming barrel of death together had a few "issues". Unfortunately, it appears they used a combination of green stuff and superglue to fix these "issues". I'm not going to complain about their model making abilities as I know mine weren't brilliant and probably still require improvement - I just have to spend more time on the prep rather than the painting.

Anyway, here are a few pictures of the pieces before my attempts to put it back together again.

 I've only got round to putting the front plate, bottom and slab of resin that makes up the top piece and fuel tank tub which coincidentally is the piece that needs the most work (look at the battle damage!).

Nevertheless I will persevere and hopefully something will get finished soon.

Thanks for reading.
Thursday, 18 February 2016
176 - Build, Build, Build

176 - Build, Build, Build

Has only one seen my mojo? My painting mojo? Nope, didn't think so. Never mind. Luckily my building mojo is here and it's been in full flow.

I started off with something simple and added some ForgeWorld armour plates to my Capricorn Chimera conversion.

Nothing too fancy but gives this Chimera a bit of a meaner profile and works nicely with the autocannon turret.

Next up was another Capricorn Chimera conversion. This one again wasn't anything too complicated. I built the Chimera kit up as per normal and then added the Capricorn rear hull piece.

I also added a ForgeWorld rear door.

I did have some issues with the Chimera turret fitting. I started off by removing the locking pieces to just have the circle plastic left. Unfortunately, the turret kept wobbling and wouldn't stay up properly, even with a bit of weight in the back. To fix this, I bought some nylon washers off eBay which had the right size cylinder to fit in the Capricorn turret hole (after some gentle (aggressive) sanding of the hole). With the washer rotating easily,


I completely removed the plastic nub from the bottom of the turret and stuck the turret to the washer. Now the turret fits nicely and doesn't fall forward.

For once I took some pictures of how I magnetise things. To start, I mark off how much space the magnet will need and then remove the plastic that is in the way using a combination of hobby knife and file. Once the plastic has been removed, I dry fitted the magnets and removed some more plastic if necessary. To make sure the magnets were placed the correct way up, I marked the top using a blue pen before applying a large amount of super glue and carefully placing them down.

While waiting for the super glue to dry completely, I started on the underside of the tank chassis. Using one of the magnets, I marked out how much of the guide plastic I would need to remove at both the front and back. With this removed, I checked the fit for the magnet and removed more if needed. It was a bit trickier getting the guide off due to it's location - hence it being a bit untidy.

To get the magnets in the right place on the inside of the tank, I held the dozer blade in it's correct position and then placed a magnet in each corner. Using a pen, I drew around each magnet and marked the visible side of them. I removed one magnet and applied some super glue, then went to the opposite magnet and did the same and then repeated for the remaining 2. Once the glue had dried, the other side of the tank is glued on.

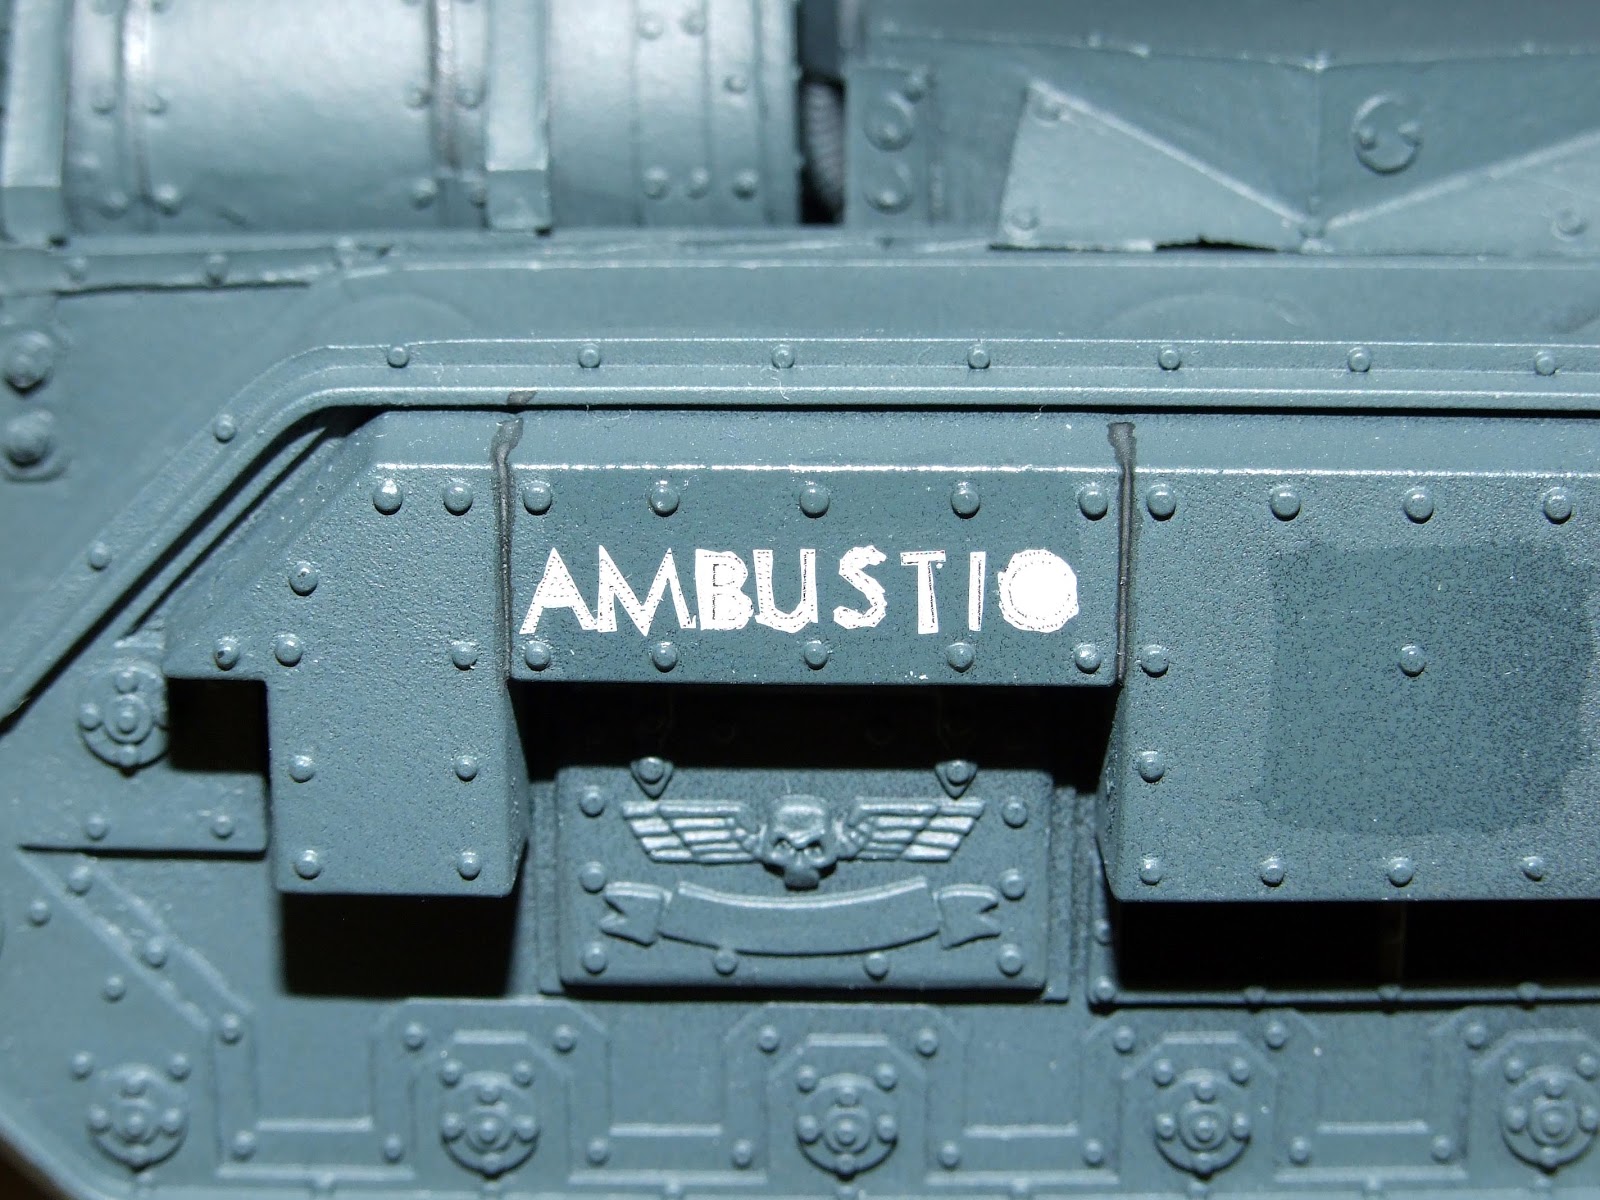
As well as getting on with building, I've also been buying and I grabbed a ForgeWorld Artemia Pattern Hellhound off eBay. The paint isn't too thick so it shouldn't be too bad to strip off.

The Inferno Cannon needs a bit of straightening out and there are a couple of gaps on the chassis, but this should be a relatively quick clean up. I'll be going for a camo pattern on this one instead of leaving it plain like the other hellhound Ambustio - it might even get a bit of extra armour.

The Hellhound wasn't the only purchase off eBay. I grabbed 42 built guardsmen with a variety of weapons. These guys need their mould lines removing and it will be a test for me to paint something that is already constructed - these will be added to the mound of infantry to be completed.

There are also two Taurox (Tauroxes?) waiting to be built and another Valkyrie.

I've got an urge to finish off the Purple Knight so I may finally get some painting done.

Thanks for reading!
Thursday, 21 November 2013
Wednesday, 30 October 2013
126 - The Mystery Shelf of Unfinished Models

126 - The Mystery Shelf of Unfinished Models

I feel like I'm flitting between projects like a bird searching for food at the moment. But at least it stops me from getting burnt out. Having done all of 10 minutes more to the Mahreens, I decided I would revisit one of the (many) unfinished projects I have on my shelves.
Tuesday, 31 July 2012
Progress? What Progress?

Progress? What Progress?

Just a short update to give you an idea of what I've been up to on the Hellhound and Manticore.

I've been trying my hand with custom transfers, which are pretty simple to do, but require an ability to be very precise with a hobby knife. Either way, they give a nice way of applying names etc without doing freehand work.

The hellhound has been dubbed "Ambustio", which according to google translate is Latin for "Fire". It has also been given the designation H44,  H for hellhound :). I will be adding a Cadian gate transfer to the centre panel's as well, which is why there is a patch of varnish.

The manticore has also received some transferry love. This tank has been named "Nubis", Latin for "Cloud". And has been designated S92. I've been trying to keep the tank names along a similar path, so the artillery relates to each other a bit, my Basilisk is "Tonitrus" - "Thunder". The hazard stripes were made by combining two of the transfers from the Guard transfer sheet.

I told you it was a short update. This isn't all I've been up to, there is more to come, but I want to finish those bits off first. Thanks for reading, and as always comments and suggestions are appreciated.
Monday, 2 July 2012
Manticore and Hellhound

Manticore and Hellhound

 A double whammy for you all today. I am currently working on two models. The first is my ForgeWorld Artemia pattern Hellhound. And the second is the all plastic GW Manticore/Deathstrike.

 So to start off with, here is the Artemia pattern Hellhound. I've had this kit for a few years and like others has been sat unfinished. It was basecoated in my old scheme of Dark Angels Green, but I sprayed it with Fairy Power Spray, and left it to soak before attacking it with a toothbrush to remove the old paint. It cleaned up pretty well, with only the light basecoat of Chaos Black remaining, which was good enough for me.

I gave the tank another light coat of Chaos Black spray just to make it even and all the resin bits needed it as they had cleaned up beautifully (probably as I hadn't washed them down properly in the first place - oops!). One the basecoat had dried, I applied Vallejo Model Air Black Green straight from the pot using the Games Workshop spray gun, the results of which can be seen below:

For a cheap (ish) alternative to an airbrush, it did a pretty good job. The coat is nice and even, with no pooling or paint runs. How much of that is to do with the paint itself I can't say. The Model Air range doesn't require thinning. I sprayed the whole model, except the tracks as I'd left them off for ease of painting. 

I did mask up the barrel of the Inferno cannon as it will be easier to paint over a black basecoat rather than the green. I have got a heavy flamer to on the hull as well. If I'd made this model recently, I would have tried to magnetise the hull weapons, oh well. That's how far I am with the Hellhound, now onto the Manticore!

And here is the Manticore/Deathstrike. Doesn't look particularly impressive without a missile, or four, attached to it. The paint scheme is the same as the Hellhound, Vallejo Model Air Black Green over a Chaos Black spray undercoat. I have done a hell of a lot more to this model, which will all become apparent in the next post. Stay tuned and thanks for reading!

Thursday, 18 December 2008
Let there be pictures! Part Three

Let there be pictures! Part Three

Thanks to all of you who have managed to trudge through "Part One" and "Part Two". Now if you haven't died of exhaustion you can take a look at the current armour attached to the Cadian 127th Regiment.

Ok so the first tank is my company command tank for the Emperor's Fist tank company. The tank is 601 Imperator Furor (Emperor's Fury) This is the first tank of the EFTC to come close to completion. I am trying to decide on locations for the transfers, if I should add company markings and also I'm experimenting on my weathering techniques on an old Chimera chassis so I can get them close to right on this beauty. When I was thinking about this tank, I wanted to make sure that it stood out as a command tank, hence all the comms equipment. The equipment on the back of the turret is from FW and the stuff on the side is from the Apocalypse command sprue.

I also wanted to make use of the Hellhammer cannon from my Baneblade kit, so with a bit of cutting and filing the Hellhammer was fitted onto the turret and so the Leman Russ becomes a Conqueror variant. Again helping to make the tank stand out is the beasty FW mine plough. This thing was a right pain trying to put together and caused some frustration but the overall result is very pleasing.

I prefer the idea of having my tanks carrying all the gear they might need for a prolonged campaign - so the backpacks, boxes and fuel cans were a must. Again there is a smattering of FW stuff here and there - I also couldn't help but decide to put a Hunter-Killer Missile on each tank. The last piece of FW kit on the model is the tank commander. Unfortunately midway through painting his right arm, I somehow managed to drop a large and heavy item (wooden box) on the very edge of the gun - hence the demented plasma pistol. I am still please with how good this guys looks though.

On my old tanks I had gone with a Dark Angels Green main coat and then camo in Goblin Green, but having used the Orkhide Shade foundation paint to do my Baneblade, I thought I would continue to use that paint for the rest of my armour. I can't describe how much I love using the foundation paints and the finish is always great. Camo patterns this time were done using Knarloc Green. Overall I think the effect is quite good - but I'm trying to decide what style of camo to use on the rest of the tanks - maybe doing one squadron in one style and the others in a different one.

The next tank is Command Tank 611 Auctorita (Power). This tank hasn't yet got all the extra gear loaded up onto it but is coming along well. My next decision is whether I want to use another FW tank commander or one from the plastic sprues. I don't know if having the FW stuff scattered throughout the whole tank company is a good idea or if it will look to sparse.

Next up is Command Tank 621 Veneratio (Honour). Again not all the gear is loaded on and painting hasn't quite started yet.


Command Tank 631 Glorificus Letum (Glorious Death) has been put together and thats about it. Now extra gear yet and no idea on what damage to put all over it. That currently concludes the EFTC. 4 made, 6 to go :S.

Here we have one of my oldest models, which has been around since I had my Praetorian force. This tank is a quick conversion, with 2 Leman Russ barrels stuck together to turn it into a Vanquisher. Still looks ok, but is in need of an improved paint job and some updating - gotta love the old smoke launchers. I've actually managed to find a picture of my Praetorian command squad and this tank when it was a member of the Praetorian regiment.
And finally to conclude this armour section, we have my FW Artemia pattern Hellhound, which is very dusty. I decided to get this tank as I was missing a Hellhound from my army list, but didn't want to go for the relatively plain model that I had seen around the GW stores i frequented (GW Bluewater, GW Bromley & GW Thurrock). This is yet another example of me being unable to finish a project. I need to glue on the hull mounted weapon and some tracks, put on some transfers and that is it done. Maybe I'll get it done soon.

I'm hoping that soon I will be able to get some pictures on of my Baneblade, Demolisher, Basilisk, other Leman Russ and 2 Sentinels. But that'll probably be after Christmas. Anyway thanks for reading and Merry Christmas and a Happy New Year to you all.
Copyright © 2012 Cadian 127th Regiment All Right Reserved