New Post

Rss

Tuesday 21 December 2010
Ride of the Valkyrie, Part 9

Ride of the Valkyrie, Part 9

Getting down to the nitty gritty bits of this project now, and giving my self a chance to practice some simple techniques that I've not tried before.

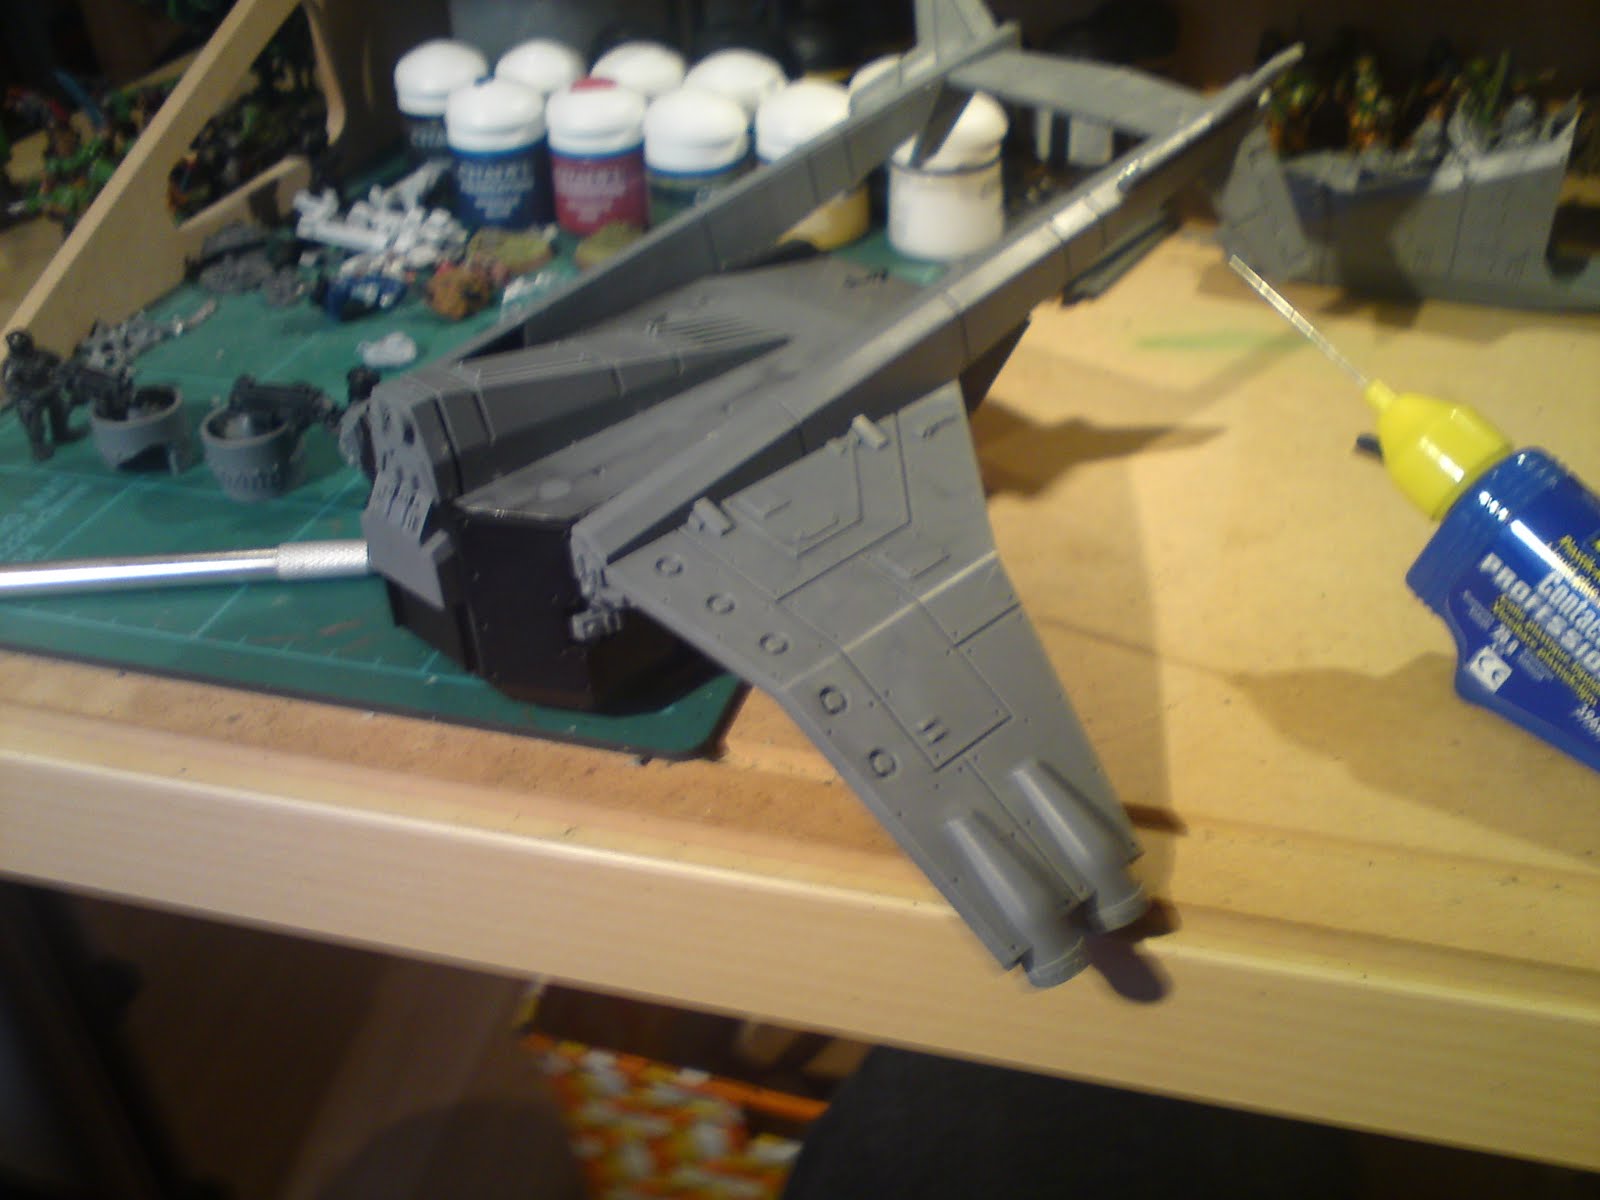
One of these is using a dark wash in the panel gaps. I've seen this technique used, and I wanted to give it a go to make the panels stand out a bit more. I used the normal GW Badab Black and applied a heavy wash into the recesses. I also applied it to the rivet holes as well.


So here is a (blurry) photo of the tail section showing the above mentioned wash. It really does seem to give the model more depth and stops it from looking like a giant slab of green.

It can also be seen in some more of the photos but first I'll explain the second thing I tried out. Once again it's probably nothing new to some of you, but a first for me - and that first is paint chipping. Normally I just use drybrushing to provide the weathering on my models. However, I wanted to do a bit more to the Valk, and so attempted paint chipping. For those that haven't tried it, basically you paint a small area with black, in my case Chaos Black, and then paint a small amount of metallic colour inside the black, Boltgun Metal for me.


The above pics show my attempt at paint chipping. I'm not sure if I want there to be lots more chips, or if the one's that I've got will be about enough. I will probably add some more to the edge's of the wings and also on the areas where the panels change.

What I have realised is that paint chipping is a very time consuming task and takes a lot of patience, especially on such a large model. I'm trying to do them in batches so I don't go cross eyed in the process. So they are the two simple techniques that I decided to try my hand at.


Having seen some other Valkyrie's on forums etc, I wanted to add the pilot's and copilot's names to the side, much like you see on other aircraft. With this in mind, I grabbed the Forgeworld Imperial Guard transfer sheet that I had an proceeded to come up with some names and possible ranks.

In the end I settled with Capt Desh and Lt Minan, and set about cutting the individual letters from the sheet and applying them to the model using MicroSet followed by MicroSol.The observant among you will notice that these are not the names in the picture above. That's because I managed to knock over my nearly full bottle of MicroSet whilst applying the transfers. I'd managed to get to Capt D and Lt Mi when this happened. Of course the MicroSet went everywhere, over my painting station, over my leg, onto the floor.

Unfortunately it managed to flood the remaining transfers off the desk and into the abyss below. So quickly scrambling round the desk, I grabbed a modelling knife and very carefully removed some sections of lettering from the phrase I had dissected in the first place. These happened to be ROTE and H and L.

Having rescued these letters, I managed to get them in place and complete the names. Some words of warning, do not work with open bottles of fluid of any kind when you have to reach round them, and try to have a back up plan in case things do take a turn for the worst. For those that want to know, I was using the phrase "Let Faith Protect Your Mind and Metal Your Flesh" as it had the most letters on it.


Now that that little disaster was over, I added some nicknames to the other side. Something that the aircrew had added to their machine when the Techpriests weren't watching. So Capt Drote is known as " Big 'D' " and Lt Mihl is "Sky". The nicknames were painted on using Adeptus Battlegrey and then a highlight line of Fortress Grey.

Right I'm off to add some more paint chips and transfers to the model, I hope to have another post up before Christmas, if not Merry Christmas to all and I hope that everyone has a great time. Thanks for reading!
Saturday 4 December 2010
Platoon 9-1, Squad 9-1-3

Platoon 9-1, Squad 9-1-3

In a break from the Valkyrie, I added the finishing touches a another infantry squad. All they needed was a wash of Devlan Mud and a coat of matt varnish, which is normally all I have left to do on most things.


So I did the usual and took photos of the front and back of each model and then used the wonders of Photoshop to get them all on the same image. I'm still extremely happy with my light box and my camera as no image adjustment had to be done :).


And here is the shot from the back. This is the last of my infantry that I'll be posting for a while. I've got the Valk and a Sentinel to finish before I start on any more foot sloggers.

Cheers for reading people.
Wednesday 1 December 2010
Ride of the Valkyrie, Part 8

Ride of the Valkyrie, Part 8

Due to the snow in the UK, I could't get to work so I decided it to do some painting (after playing on Gran Turismo 5 for several hours).

I worked on the pilot and co polit, and their cockpit's and also the under wing weapons. Here are some pics for you to enjoy:


First of all a pic looking at the two crew members. Like other's, I wanted to give them an individual feel, and painted the helmets differently. The front guy's helmet was a right pain with it being white, I lost count of how many thin coats I had to put on, and he still isn't quite finished. I went with a grey stripe using Adeptus Battlegrey, then Codex Grey and finally Fortress Grey. Its plain and simple but pretty effective. His targeting eye isn't finished yet, and needs a dot of bright red, and a gloss varnish once I've done the matt varnish.


The other side of the crew, although the front guy is a bit bleached. In contrast I painted the rear crew member's helmet bright blue, Enchanted Blue to be precise, with a highlight of Ice Blue and then an Asurmen Blue wash. The visor was a Mechrite Red base, then Red Gore, then Blood Red, then Blazing Orange with a Skull White dot. This will get a gloss varnish like the targeting eye on the guy in front.


This picture focuses on the rear crew member a bit better. You can also see the detail on the top of the helmet a bit better. I left this section black and painted on small X's using Iyanden Darksun, with a small dot of Skull White in the centre. The edge of the helmet was highlighted using Codex Grey.


Time for a top down shot. This shows off the helmet designs a bit better, but the main focus here is the dials, readouts and buttons. I wanted to try and keep the colours that I used down to a minimum, so I doesn't look like I used every colour in the spectrum for the dials etc. I've done a test fit of the clear canopy and the inside still stands out which is a result.


Finally here are the two under wing HK missiles. The missile warhead was basecoated Mechrite Red with a Blood Red highlight and then a wash of Baal Red. The body of the missile was basecoated Codex Grey. I then applied a Fortress Grey highlight. I'm not sure if I want to put a light wash of Badad Black over the missile body, I may just put it in the recesses.

So thats all I've got done, I'm still finishing off the pilot/copilot and have started work on the missile pods. Once they are done I'll get the engines finished. Until then, thanks for reading and feel free to leave comments, suggestions etc. Cheers.

Sunday 14 November 2010
Ride of the Valkyrie, Part 7

Ride of the Valkyrie, Part 7

Thanks for the ideas and the votes on the poll, the outcome is that the underside of the Valk will be done in the same camo as the rest of the model. Having this weekend off from work meant that I could get some work done on the model (note - I say some work). So I broke out the spray gun and propellant, grabbed the two paints I needed and covered the kitchen table in cardboard (so the missus doesn't kill me - and also as the weather in the UK is somewhat windy).

Things got off to a bit of a bad start as my Orkhide Shade wouldn't mix to the correct green so that went down the drain and I had to break open a new pot, but I eventually got the right colour and consistency, I thought. I also forgot to take any pics of this stage.

I gave the Valkyre a good covering and left it to dry for several hours. However when I came back, there were some pools of paint/water on the model. Turns out I'd used too much water to thin the paint down - school boy error, but never mind. Fortunately, I plan on weathering the model more heavily than my previous tanks so this should cover up the mistakes.

Next up was to get the Knarloc Green. I wanted to try just spraying the camo pattern on rather than masking it all out. Basically, I passed the spray gun over the model in a diagonal line to lay down several light coats of green - and here are the pics of the model with the spraying complete:


The first pics are just to show off the camo pattern accross the whole of the model. I've intentionally left the engines black as I didn't want them to be the same as the rest of the model. I'll be trying out some rust/metal ideas on these.


A couple of shots of the right side of the model. I covered the cockpit section with masking tape as it'll probably be easier to paint from the black base coat.


Some upturned beetle shots to show the camo on the underside. One with the door open and one with the door closed.


And some more underside shots. One shot of the opposite side to the previous pics, and one showing off the whole camo.

Overall I am very very happy with how the camo turned out. Next time though I'll try to take more care with my paint mixes and I perhaps won't do as thick contrasting camo lines.

Thanks for reading and please leave comments and suggestions if you wish. As always they will be appreciated. Cheers.
Sunday 7 November 2010
Ride of the Valkyrie, Part 6

Ride of the Valkyrie, Part 6

Just a quick update. With the build complete, it was time to spray the model black. I just had to do one thing first...


And that one thing was using some masking tape to hold the doors in place and to make sure there is no way that the spray can get into the interior. This was an immensely annoying job as the interior is too small to get a hand into so I ended up using bits of sprue to poke the tape into place - it did work though :).


I did suffer a little bit of frosting when the spraying was done, but for a base coat I'm not too annoyed. I only took pics of the Valk and the engines as the weapons really don't look anything special. Sorry for the crap quality of the pics by the way.

So it is now time to paint this bad boy up. I'm thinking of going with my usual vehicle scheme of Orkhide Shade with a camo pattern in Knarloc Green. My main problem is that I don't know if I should do this all over the model or have a light colour, such as grey, for the underneath. Please let me know what you think in either the comments section or the poll that will be on the right (or both). Thanks for reading!
Wednesday 27 October 2010
Ride of the Valkyrie, Part 5

Ride of the Valkyrie, Part 5

Let me start by saying "oooh magnets!", closely follwed by "curse you magnets!".

This week I've continued the Valk project by magnetising the weapons, which I'll get onto in a moment. First off though I attached the cockpit section the main body and then added the landing gear.


The first pic is just all the landing gear laid out having been removed from the sprue and cleaned. For those that haven't built a Valkyrie, GW has done a very good job making sure that you can only glue similar pieces in the right place, so that everything lines up and sits correctly. The second pic is just a shot of the landing gear in place.


And here are some pics showing the cockpit section in place. I had to hold this in place for a while so that the glue took hold as I found that the section was moving away otherwise.


So moving onto the magents. I wanted to magnetise as much as I possibly could from this stage. I started with the cockpit sensor arrays and weapons. I followed the tips from Col. Corbane's article on magnetising the Valk, which can be found here. The instructions were really useful, and saved me from struggling through like a blithering idiot.

The sensors and weapons were done by drilling a 2mm hole as close to the centre as I could get. I started with a 0.5mm drill bit and then worked up to 2mm with a 1mm and then 1.5mm bit. Next I glued in a 2mm magnet, checking to make sure that the polarity direction was the same for all of them. This was done so that they would all attract to the magnet that will be placed in the housings on the cockpit.


Here are the shots of the side sensor and weapon mounts. Again, I followed Col. Corbane's instructions by using some green stuff to make a mount for the magnet to be attached to. So being very sure about the magnet polarities, I glued another 2mm magnet into each mount. And so this section was complete!

I was hoping that I could make a fixing so that I can have another lascannon on the other side, but the steps get in the way. So I'll have to try and make a double lascannon mount for a Vendetta conversion.


Next up I worked on the wing mounted weapons. The HK missiles were the easiest to do. Firstly, the majority of one of the fins had to removed from each missile. Then I drilled two 2mm holes in the top (they ended up being a bit close, but live and learn). Next a 2mm magent was glued in place. Again I can't stress how important it is to ensure the polarities are correct. I think I lost count of the number of times that I dry fitted everything.


For the missile pods, a little more work was required. The two cylinder sections were glued together as normal, but once they were dry a large blob of green stuff was place inside each on the section where the pods attach to the wings. Once this had cured, the mount was removed using a modelling knife. Now it was time to drill the holes for the magnets. The green stuff that was inserted earlier is for providing a bit of extra strength and also some extra depth to drill in to. Again two 2mm magnets were added. Next up is the wing mounts themselves.


The wing mounts were probably the most difficult part of this build. The first thing that had to be done, was to get some more green stuff and push it into the V shaped mount. I had a bit of overflow on the sides, but this can be cleaned off easily once the green stuff has set a little, after about an hour. The green stuff needs to fully set before anything else can be done, so leave it for at least 24 hours.

Now that the green stuff has set, it's time to drill some more holes. Break out the 0.5, 1, 1.5 and 2mm drill bits again and drill two holes in the green stuff. Try to avoid placing them too close to the ends, or the green stuff may break, like it did for me - thank god for super glue! Once the holes have been drilled, dry fit the magnets into them, once again checking polarities. When I was happy with everything I glued the magnets in place. And that concludes all of the magnetising!

Now for some reason I haven't taken any photos of the weapons attached to the mounts etc, but I will get some done for the next update. Thanks for reading through this mammoth post, and feel free to leave comment/suggestions! Cheers!
Friday 15 October 2010
Ride of the Valkyrie, Part 4

Ride of the Valkyrie, Part 4

Continuing my extremely slow construction of my Valk, I move onto the next stage, the cockpit.


The first stage is getting the two crew members placed in their seats and then getting their arms attached. This is pretty easy as the seats have the grooves in them to align the arms more easily. The only choice I have to make is which head to use. So I went with the closed visor for the copilot and the targeting head for the pilot. Once these were dry I glued the consoles in place and the two seats together. I didn't take any pictures at this point though.


Next up was the exterior of the cockpit. So again I cleaned up and laid out the pieces to get an idea of what I have to do. I can't believe how fiddly the nose section is. The sensor array is probably the most fiddly. But in the end it all fitted together nicely.


So here are a couple of pics showing the completed cockpit section, all except the clear canopy and side weapon and side sensor. I'm not too sure about the strength of the canopy support inbetween the two crew members, it seems like it may fall off with the slightest touch.


And to finish off, I've glued the wings onto the main body. I'm still trying to find my magnets before I attach the weapon mounts.

So next up is attaching the cockpit to the main body and getting the odd little bits finished. Thanks for reading, and as always comments and suggestions are grealty appreciated.
Saturday 2 October 2010
Ride of the Valkyrie, Part 3

Ride of the Valkyrie, Part 3

So its time to take a look at how this project is progressing.

When I started this project I thought about magnetising everything using Col. Corbane's excellent guide here, but I kind off forgot about it and by then it was too late. So instead I've decided that I'll just magnetise some parts, and by some I mean the wing mounted weapons and the nose weapons. However, I'm not quite at that part of the build, mainly as I can't find my magnets!

In the mean time here are some progress shots:


Firstly, I glued the other tail section onto the main body. I also glued the cross piece that runs between the two at the back. Both side doors open nice and smoothly, one side a bit to easily though. I did have a little problem, which was the little piece that goes on top of the heavy bolter support fell off. Obviously not enough glue. This proved to be a right pain to try and glue back in, but eventually I managed to get it back in place - after some swearing!


Next up, I got to work on the engines. At first I thought that the two separate top pieces for each engine were going to be a pain, but they fitted together quite nicely.


Finally came the wings. I chose to remove all the little rivets that are on the thrusters as they just didn't look right. So the first pic is all the bits laid out, while the second one shows them drying with the aid of some elastic bands.

The next stage will be to get the cockpit and pilot/co-pilot completed. Cheers for reading.
Wednesday 22 September 2010
Ride of the Valkyrie, Part 2

Ride of the Valkyrie, Part 2

Time for an update on my continuing Valk construction project.

Things are progressing quite nicely, I think. I decided not to add any more detail to the interior. I think that the drybrushing does the job well enough and people seem to like it, so why mess with it.

My next task was to get the door gunners completed. This meant undercoating all the various components. I chose not to use spray paint for this and instead used the Foundation Undercoat Black, followed by a coat of Chaos Black. This gave the models more of a gloss finish which is what I wanted. Again I wanted to keep things simple, so I stuck with the drybrushing technique.


The above pic is one of the arm mounts and the swivel mounts. The other arm was already in place in the transport compartment. These pieces got the same drybrush as the interior, Codex Grey followed by Fortress Grey. And the other pic is how the other arm looks in the Valk itself.


The gunners themselves got a slight variation. Rather than using Fortress Grey as the extreme drybrush, I went with Skull White, for a really bright layer. The pictures here don't really show it, but hopefully when I get the big camera out this will show up better. I thought about different colours for the uniform but I think the black flightsuits work well, and will also be used for the pilot/navigator when I get round to doing them.


The arms got the same treatment as the gunner's bodies. I toyed with the idea of making the hands my usual flesh colour, but then figured that the crew would probably be wearing gloves. The heavy bolters got the Codex Grey/Fortress Grey drybrush. Again I was a little torn with what to do as all of my auxiliary weapons tend to be a bright green, but I decided to stick with the darker side this time. Painting them Dark Angels Green was also an option but I'm glad with how they turned out.


Now that the weapon mounts were done, I could finally glue my two transport compartment sections together. A little bit of glue and some elastic bands later and the back end was sitting waiting for the glue to dry.

The next stage is getting the engines ready and finishing of the tail sections before I tackle the wings. Thanks for reading!
Copyright © 2012 Cadian 127th Regiment All Right Reserved