New Post

Rss

Thursday 26 March 2009
On The Move

On The Move

Things around the home have been just a little bit hectic recently. This is done to the fact that the misses and I are moving home. As of today we are still waiting on hearing back from the letting agency about the place we wan't, but so far so good (touch wood). We are moving from our current 2 bed terrace in Derby, where our landlord is charging a high (ish) rent to a 3 bed semi in Stoke-on-Trent which is cheaper per month. This move isn't just because of the rental price but also because my other half has got a new job in Stoke (more money for her to spend on me :) ).

As those of you who have moved house before know, it can be a stressful time and quite frustrating when you realise how much crap you've got to box up. Luckily I think my current project is being spared the packing box for a few more weeks. Now I just have to get around to actually continuing with it.

The current project at the moment is 30 guardsmen - including Sgt, Vox, Special weapons. Here are some pics of this WIP. Although there are only 27 (I think) in the pic below, rest assured that I am working on 30 men - I'm not going crazy (yet!), the other 3 are yet to be glued to their bases.


As you can see, I've already got started. All of the legs were removed from their sprues and glued to the bases a while ago, so I've had to go along and remove all the mold lines along with the basecoat. Oh well. I've then painted them in a bit of a random order. Some of the models have got torsos and have already been painted up whereas others havent had certain areas painted. I'll try and explain the paint used etc. My basic idea for all of my Guardsmen is Goblin Green armour and Snakebite Leather clothing.

So the plan is to give all the trousers some light coats of Snakebite Leather. Then to do the boot fronts in Goblin Green, with a Camo Green highlight, and the boots themselves in Chaos Black. Once I've done this I'll be gluing the torsos onto the bodies and will begin painting on that.

These next pics are just of my current collection of things to do etc. The left hand pic is just my pile of boxes containing stil on sprue models. The box underneath the tank company contains my WFB Empire army - yet another giant army that will take ages to paint all the infantry. The middle pic is one of the shelves next to my painting station. Again odd boxes of sprues, Space Marine Vets and unfinished models. And the picture on the right is of another shelf with my on hold Leman Russ' for my tank company, some Empire models and some spray paint etc. As well as a squad of Space Marines.


Finally just because I was bored with my camera, is a photo of my left leg just below the knee (knee at top of pic). This lovely bruise and scrape was earnt on Sunday at football - think it's from a strikers studs. Just thought I'd share that with you all :). Thanks for reading!

Wednesday 18 March 2009
Fire Support Squad - Heavy Bolters

Fire Support Squad - Heavy Bolters

Continuing in my strange way of actually posting some completed models here is my first Fire Support Squad consisting of 3 heavy bolters. A second FS Squad of autocannons is in the pipeline. So here is a photo of the entire squad.


I'll now try to explain each model, starting with the team on the right. These team was done to try and look like they had basically just set up their weapon and hadn't had a chance to fully prepare it before engaging the enemy - so the gun shield is off and their pack has just been kind off thrown down. This idea also works with the loader firing off his lasgun in support.


And onto the second team. This is the one on the left of the main picture. Here I just went for a simple plan and just had the loader pointing out targets as the hapless guy on the gun tries to mow them down (with his useless BS3).


And the last team is the one in the middle of the main pic. I tried using an idea I saw in White Dwarf when the plastic Cadians first came out of trying to model a guardsman lying down. It sort of worked, although the pose is not really near to how a real person would be when prone. Anyway, this team was done so it looks like the gunner is running back to engage the enemy having been away from his post (tut tut).


I thought I'd try and give an insight into how I painted these models as well, everything was basecoated with Skull White spray to start. To begin with I'll explain the base. This was painted with Graveyard Earth. Some PVA glue was applied and modelling flock added. This on its own looks a bit lame though. So some more Graveyard Earth was applied to add variations in colour - to look like mud. Small blobs of PVA were placed around the base randomly and static grass was added - although certain pics don't really show this.

The heavy bolters themselves were painted with Goblin Green with a Camo Green highlight for the body of the gun and Boltgun Metal for the metal areas. The stand was painted with Chaos Black before Boltgun Metal was drybrushed over it. The ammo in the feeds was painted with Codex Grey with a highlight of Boltgun Metal. The ammo clips were painted with Red Gore.

The lasguns were painted in the same way as the heavy bolters, except that Mithril Silver was used for the barrels, magazines and also the stock ends. A highlight of Codex Grey was also applied on the stocks.

Now onto the guardsman. The clothes for these guys were done with Snakebite Leather, no additional layers or highlights were adde. Any green areas were done with Goblin Green and then a Camo Green highlight. The flesh is eithe Elf Flesh or Tallarn flesh. Once this was done everything was given a wash with Devlan Mud.

Thanks for reading guys. Oh and by the way definitely check out Admiral Drax' 100th blog to see the might of a Cadian regiment.
Saturday 14 March 2009
Red Angel Sentinels

Red Angel Sentinels

When I decided the other week to try and put the finishing touches to a few of my tanks I also thought that this would be a good chance to finish two Cadian pattern sentinels that had been collecting dust - no change here I'm afraid.

So now that I had this brilliant idea to get them done I sat about staring at the little walkers for a while. And I came to the conclusion that whilst I could add some little details and do a bit of touch up painting here and there, I couldn't be bothered to repaint pretty much the whole of the upper section of the crew compartment on both walkers - this had become quite badly chipped. Instead I'm going to leave it how it is as it kinda pulls off looking worn and battered rather than poorly painted. On one of the sentinels I am yet to paint and attach the pack/las pistol that go on the side of the crew compartment.

With that painting dilemma out of the way, I went about adding the Red Angel marking to the side of each sentinel - this is a transfer from the Leman Russ sheet. I'm trying to decide if I should just add single numbers to the sentinels or use roman numeral markings. Any personal preferences will help me gauge what will look better. I also repainted the lamp on the front in Iyanden Darksun. I did also try to improve the bases a little bit by adding some patchy muddy areas and some static grass. The bases still look a bit bare, but I'm hoping to add some debris in the form of a weapon or body. Now to decide which enemy of the Imperium I dislike the most. I suppose as they are Cadians it should be Chaos Space Marines or Daemons. Decisions decisions.

So without further ado here are Red Angel 1 and 2 - simplest way of marking them so far. Red Angel 1 first. Sorry about the amount of random stuff in the pictures - haven't got round to reinstalling Photoshop since the Pc rebuild.


The next post will be my completed Heavy Bolter squad. Comments are welcome as always.
Thursday 12 March 2009
Mortar Support Squad

Mortar Support Squad

Well I've finally managed to finish the mortar squad. Be prepared for an abundance of posts over the next couple of days - including a completed heavy bolter squad and several Sentinels.

I'll start this post off with a picture of all 3 of the mortars.


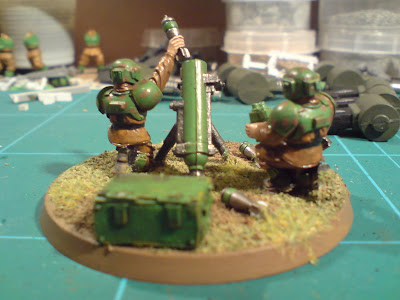
I'll start off by explaining the team on the right hand side of the above picture. Starting with a picture of the front of the team I've tried modelling one of the mortar rounds actually being fired. I think it looks ok, but may have been better if the round was further in the tube. This is the only picture of this team that partially shows my attempt at making skin look a bit better. The trooper on the left (as you look at the picture) has had a layer of Tallarn Flesh, followed by a Devlan Mud wash. Elf Flesh and then Rotting Flesh were then drybrushed onto the model. This was then finished off with a very light wash of Ogryn Flesh.


Next we have a picture of the side of the team, sort of showing the one handed sight I created. I used the sight from the heavy weapon sprue placed on top of the hand with trigger for the missile launcher. This was glued to the arm and shoulder that originally had a hand holding a laspistol from the Cadian sprue.


A shot showing the back of the models. Everything was given a wash of Devlan Mud.


Finally for this team, here is a picture looking down on the team, showing the layout of the models on the base.


Ok onwards. Now to start on the second team, which is the one in the middle of the main picture. Here is a shot of the front of the team.


A picture of one side of the team. This picture shows the teams lasguns propped up against an ammunition crate while they bombard the Emperor's enemies from afar.


The back of the team, again showing the lasguns and aummunition waiting to be fired.


The other side of the team. The crate that the lasguns are leaning on is from ForgeWorld.


And last but not least for this team, a photo showing the layout on the base. Once again everything got a wash of Devlan Mud to "dirty" the models up a bit.


And here is the last team of the squad. I think that the two poses of the troopers work well together - with one really shouting things out and the other preparing additional rounds and spotting where previous rounds fell.


Here is a side shot showing the loader placing a round into the tube.


A quick shot of the back of the team - showing another ForgeWorld crate. As with the other teams this one was given a wash with Devlan Mud. Also I used Camo Green to highlight the Goblin Green sections of the models.


The other side of the team. These guys obviously aren't bothered where they keep their ammo lying as long as its within reach.


And the final picture of this post is of the team from above, once again showing the layout of the models.


And there you have it. One Mortar Support squad finally completed. Think I need to work on my speed skills. Comments as always are appreciated.

Oh one final thing. Has anyone had any experience of using the GW Spray Gun? I was looking at getting one in order to quicken up my completion of some tank models etc, but wanted to find out if anyone has any good or bad experiences with it. Thanks.
Wednesday 4 March 2009
Mortar Squad Update

Mortar Squad Update

As promised here are a couple fo pics of one of the Mortar teams awaiting completion.


The first picture is just showing the team from an angle at the front (with my nearly complete sentinels in the background).


The second picture is obviously a top down view. The crate at the front is just from the Imperial Guard tank accesory sprue whereas the one at the back is from ForgeWorld. I'm debating on if I want to add some sort of markings to my FW crates, maybe a serial number.

This picture also shows the extra ammunition laid out behind the tube. I've got enough spare bits to include several extra rounds on each base. These provided a welcome distraction from painting lasguns. Annoyingly the base hasn't shown up very well, but I still have to add some static grass. Other than that I need to add 2 lasguns leaning against the back crate, finish off the heads and give pretty much everything a wash of Devlan Mud. Now to motivate myself to complete these guys.

- One other thing guys, has anyone used the Games Workshop spray gun? And if you have is it any good. Basically I'm looking at getting a cheap (ish) spray gun so I can complete my Emperor's Fist tank company a bit quicker and also to make the camo schemes easier to apply. Thanks in advance for any comments.

- Cadian 127th
Copyright © 2012 Cadian 127th Regiment All Right Reserved