New Post

Rss

Saturday 28 February 2009
PC Rides Again

PC Rides Again

Well after several hours I have my Pc working again. I had to reformat the hard drive and reinstall Windows but it finally works.

So here is a pic of the tank sponson weapons as of about 12 hours ago. Basically the heavy bolters that are nearly complete are at the top of the pic. These just require another coat of Goblin Green and a highlight. The heavy bolters at the bottom require several coats of Goblin Green and then the highlight. And the lascannons require some Mithril Silver for the tips of the barrels, some coats of Goblin Green for the barrel surround and then maybe a highlight.
No pictures at the moment for the mortar squad, however the 3 teams are nearly complete so I hope to provide you with some pictures by the weekend. Thanks for reading.
Thursday 26 February 2009
no image

Argh! Stupid PC

Argh!!!! For some strange reason my PC isn't liking google at all at the moment. every single thing related to google does not work. This of course means that I am unable to update my blog from my own PC. So instead I am having to use my fiancee's laptop to do this update.

First of all, thank you to those that voted on what I should try to complete next. The vote was tied between my Lascannon squad and Mortar squad. So I am going to go with the one that is nearly complete (trust me to go for the easy option), which is the Mortar squad. There is a picture of the Mortar squad in an older post: "Let there be pictures! Part Two". And if you want to skip staight to it hopefully this link will work "Mortar Squad". I have already started the basing on the relatively untouched mortar and have also selected and prepared the legs and torsos to be used. Stay tuned for some WIP pics when my PC is not being as useless.

I was also going to add an update picture of the sponson weapons for my remaining LRMBTs but again its not possible. So I'll just say that basically all I have left to do is paint some areas Goblin Green, do a highlight and then maybe a quick light wash with Devlan Mud.

Thats all that I've been up to. Have a good day everyone and maybe there'll be some pics on here later (google permitting). Cheers.
Monday 16 February 2009
Sleep Patterns

Sleep Patterns

For the past week I've been matching my fiancee's sleep pattern - which basically means that I've been waking up at about 7.30pm and going to sleep at around 9.00am. Strange isn't it.

Anyway, thats not the main reason for this post. One of the reasons is to inform everyone that there will be some more pictures appearing on here of a few tanks that I've managed to finish (apart from varnishing (at time of posting)). I've completed my Basilisk B23, the Leman Russ Conqueror/MBT command tank (as seen in "Let there be pictures! Part Three") for my Emperor's Fist company, a Demolisher and another Leman Russ MBT. Stay tuned for those new pics.

The other reason is a quick update on what I'm currently working on. Now that I have seen the pictures of the sprues for the new Command Squads I'm glad that I've decided that I will wait for them to be released. Check out the post on "Bell of Lost Souls" and prepare to be impressed if your a Guard player. And so I'm continuing my work on some infantry squads, so again please be patient for some shots of these guys.

The final thing I'm on at the moment is the sponson weapons for the remaining six Leman Russ' for my Emperor's Fist tank company. Basically I've removed all of the remaining sponsons from the sprues and put them together. And here is a picture of the guns after I'd done this.

The weapons were then cleaned up to get rid of any lines/gaps etc. Once all of this done I put a bit of blu tack on the back of the sponson mounting and stood the guns up on a bit of card. Then I gave them all a nice coat of Chaos Black spray. Once this had dried during the day (or overnight depending on if your awake the same time I am). Obviously there were some parts that needed touching up, so out came the crappy starter brush and these bits were painted with Chaos Black. Again this was left to dry and then progress was actually made. First I had to mix up my Catachan Green paint as it had separated (if anyone has any tips on how to do/prevent this please help). But I ended up making it a bit too thin, so had to apply three coats onto the sponsons. Anyway it looks good now and all I have to do is the more tricky sections. Another picture to show this.


I probably won't do anymore to them tonight but I'll be doing the metallic parts next - so barrel, under barrel and symbols. Thanks for reading everyone.
Wednesday 11 February 2009
Baneblade Super Heavy Tank - Vengeance

Baneblade Super Heavy Tank - Vengeance

I think that the title for this post says it all.

I have finally finished my Baneblade that has been collecting dust for the past couple of months. I can't believe that I hadn't managed to finish it. So without further ado here is "Vengeance":

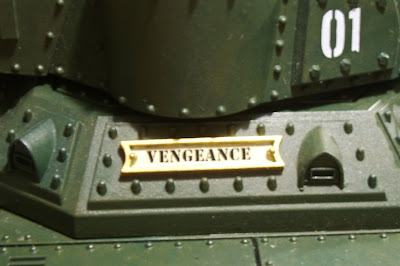
This is the name plate on the right hand side of the tank just under the turret. "Vengeance" is a transfer from the FW Imperial Guard Vehicle sheet. Although a little bleached in this picture, the name plate is edged in Shining Gold with the inside of the plate in Bleached Bone. A layer of gloss varnish has been added to help protect the transfer. Also in this picture the dirtying up of the tank can be seen (sort of). Basically I drybrushed the entire tank with Catachan Green. It gave the model an older look without going over the top.


Here we have a view of the front of "Vengeance" - looking very dusty. I used Orkhide Shade for the main body of the tank. I also chose not to use a camo scheme - I don't think camo is going to work on something this big. The heavy bolters, lascannons and autocannon were painted with Goblin Green, keeping with the colour scheme of the rest of my force. The targeting lenses were done with a coat of Mechrite Red, with a light overlay of Red Gore. A small highlight of Skull white was then placed in the corner. The viewing slits were done with a similar technique. This time Enchanted Blue was used, with a highlight of Ice Blue and Skull White. The searchlight is Iyanden Darksun. All of these "glass" areas were protected with a gloss varnish - after the entire model was protected with a matt varnish. The metal areas were either Boltgun Metal straight onto the surface or drybrushed on. The "For The Emperor!" transfer is again from the FW sheet.

The left hand side of the tank. The marking at the front of the tank was done using Mordian Blue with an Enchanted blue highlight. The two transfers on the turret are from the Baneblade sheet. The tracks were drybrushed first with Boltgun Metal and then a light drybrush of Mithril Silver.


The right hand side of the Super Heavy. Again the two transfers on the turret are from the Baneblade sheet. The name plate can also be seen a bit better on this side - as can the autocannon. This side shows that the Catachan Green drybrush helps to stop the tank looking uniform - the tank marking is brighter than on the other side of the tank.

Here's the view of the rear of the tank. The Tech shrine was done using Skull White for the symbol, Brazen Brass for the detail. Bleached Bone was used for the purity seals with a highlight of Rotting Flesh. Red gore was also used. Again metal areas were either painted with Boltgun Metal directly or drybrushed.

And finally we have a picture of the commander. Again this picture is a little bleached. I'll start from the top for this guy. His hair is Graveyard Earth with a Snakebite Leather highlight. His headset is Chaos Black with Codex Grey highlight and Boltgun Metal drybrush. The flesh is Tallarn Flesh with an Elf Flesh highlight. The bionic eye is Red Gore. The laspistol is Goblin Green with a Camo Green highlight and Mithril Silver for the barrel. The uniform is Snakebite Leather. His badge and honours were picked out with several different colours. The entire commander was given a wash of Devlan Mud.

And there you have it. One finaly completed Baneblade. Ready to deliver 11 barrels of righteous death to the Emperor's foes.
Wednesday 4 February 2009
Progress

Progress

As the rumours of whats coming out for the Guard continue to circulate, so I near final final completion of some infantry squads.

Both squads for Platoon 7 and Platoon 9 (4 squads in total) are just awaiting varnishing. This is currently not possible with the freezing weather - damn! I have however managed to get some quick pics of a sergeant and vox-trooper - using my camera phone - hence the poor quality. These squads are the first ones I have done using a Camo Green highlight on the Goblin Green pieces and have also used a Devlan Mud wash all over the model.

I will be getting my fiancee to take some photos of the complete squads so stay tuned.
Also I will be renumbering the squads - Squad 712 is now Squad 222, Squad 714 is to become 242, 913 becomes 333 and 914 becomes 343.
Enjoy!

Squad 714 (242) Sergeant

Squad 712 (222) Vox Trooper
Copyright © 2012 Cadian 127th Regiment All Right Reserved