177 - Voss Pattern Lightning: Part 3
I've made a promise to myself that I will do everything to write a post at least once a month. I've set this target so that I really push myself to do some hobbying as recently I just haven't had the motivation - and with The Division being out, my time is spent on my PS4.
So this months offering is an update on the Voss Pattern Lightning. Having done all of the cleaning, prep and building, I undercoated the fighter with Vallejo Model Air Grey.
With the undercoat done, it was time to try out GW's own airbrush paints. The first one up was Calgar Blue (Air). Only the top of the Lightning was painted using this so the underside would be a different colour.
A few light coats were sprayed on and I tried to make sure everything was covered nicely. Once the paint was dry, I applied some Classic Camo stencils from Anarchy Models HD range.
Yet again I forgot to take a few photos. So the one above shows after I've laid down the stencils, then applied Lothern Blue (Air) and then applied the next layer of stencils. The stencils weren't really playing ball - I had a few problems getting them to stay down on certain areas. It just meant I was a bit more careful when laying down the next colour.
And here is the next colour laid down and with the stencils removed. The final paint was Caledor Sky (Air) and was again laid down in a few light coats. With this being the last layer, I did put it on a little heavier to make sure the coverage was nice and even.
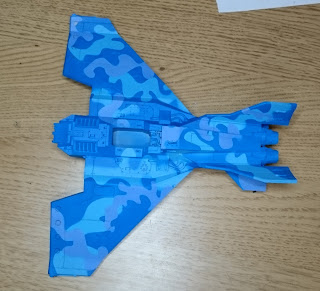
Top down view - quite effective, though the Calgar Blue is a bit more purple than I was expecting.
View from the other side. Unfortunately, I did suffer one spot where the paint came off when removing the stencils. This is right towards the front of the wing tip. A bit of weathering or a repaint will cover this nicely though.
Side view - nothing too complicated here. I tried to carry the patterns over the edges of the wings.
Other side - makes me realise there is a big area of Caledor Sky that I may need to break up on the back edge of the wing.
My plan was always to paint the underside of the Lightning a flat different colour to the top camo. So using some Tamiya masking tape, I taped all around the wings, fins and edge of the fuselage to protect from overspray and get some nice clean lines.
And here is the underside painted in a nice flat Russ Grey (Air). I was really impressed with the coverage and smoothness of this paint. I do need to go over a few areas where it didn't quite cover the blue overspray.
The tape did an excellent job of keeping the camo safe and really did give a nice line - I might use this for all my fliers in the future. Unfortunately, I did have another couple of tiny spots on the front of one wing where the paint came off with the tape - annoying, but very much a quick fix.
This was my first experience of using Games Workshop's new Air range of paints and I quite like them. The coverage is good and even without any airbrush thinner, I didn't experience too much dry tip on the airbrush - something I'd had with the Vallejo Primer.
I neve got around to ordering some empty Vallejo dropper bottles so I had to pour straight from the pot. This was a small inconvenience as the lids kept trying to close, but there wasn't a huge amount of wastage when I'd finished pouring. Trying to get paint that hadn't been used back in the pot was more challenging.
Next up will be weathering and painting the cockpit and weapons.
Thanks for reading!


3 comments:
That's looking great! Really dig the camo scheme.
It does look like a good job - I really wouldn't worry about the blue flaps, once you have decal'd and done whatever weathering you plan on, I'm sure it'll all just blend in.
@ Mordian7th - thanks, you never know how these things will turn out
@ Zzzzzz - that's what I'm hoping for. I've got to find some decals now.
Post a Comment