169 - Tracks, But Not Tank Ones - Part 4
Hello all, and welcome to part 4 on our attempt at creating a really good Hornby layout as a gift to my dad. If you're not aware why myself and my brother in law are doing this, please read Part 1, Part 2 and Part 3.
From the last update, you could see that we were starting to make a bit more progress. The layout was pretty much sorted and now we were starting with all of the decorative touches. This update is a continuation and focuses on the swing out and hill/tunnel sections.
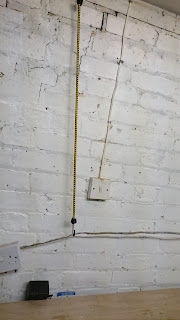
As with any project, there will be some strange occurrences and here you can see ours. The power ring in the garage was at exactly the same height as our scenery would be, so we turned off the power, used the crappiest torches known to man and removed the sockets from the wall. Now we had to hold them out of the way somehow. Fortunately an old nail on the wall, a hook on the ceiling, a bungee cord and a power transformer did just the job.
As usual, my ability to not take progress photos shows through here as at this stage, the hill base was finished and glued/pinned down. In order to keep the hill base secure, we glued it down with PVA and then drilled some holes in the hardboard and very gently screwed some large screws in to the hill base, taking care not to rip the celotex. As well as fixing the base to the hardboard, we used some tube lengths to act as guide pins so the top and bottom pieces of the hills will (hopefully) always line up.
The hill base it self was painted using a combination of black (for the tunnel), Halfords Grey primer (for the rock), Halfords Rover Maple spray (for the earth) and Halfords Peugeot Conifer spray (for the grass). The rock face was then PVA'd before having ballast scattered on to it.
And all of a sudden the hill has a top! Once again, no progress pics (sorry). But I can talk you through what occurred. The hill top is made up of two pieces of celotex - one rather substantial piece that forms the main section and another smaller piece added on top to provide a bit of gradient. We did have a different top piece, but it made the hill look like an igloo so that went in the scrap pile.
The top of the hill received the same Halfords car spray treatment but got a coat of mixed flock glued on. You can also see our tunnel entrance and additional cliff face. The cliff was a spare piece of celotex coated in PVA and ballast, and the tunnel entrance was from the bargain bin in a model shop and does the job pretty well. We did our best to make it look like it fits with the tunnel face. Some flock was added around the tunnel to give the impression of grass growth. You can also see the bridge we were constructing and my brother in law's hand holding the other tunnel piece in place.
We got quite a bit done on the swing out section. The river was nearly finished and is waiting for a coat of gloss varnish (no fancy water effects here). We added a bridge to one section and coated pretty much everything with flock. As you can see the flock continues on both sides of the swing out section.
That's as far as we got, but we were spending a couple of days on this so there will be another update pretty soon and I hope you'll all be impressed.
Thanks for reading.


2 comments:
Love the electrical bodge. Not telling you something you don't already know but...
And also the swing out section. Absolutely ace.
@ Zzzzzz - that electrical work is pretty good when compared to the rest of the garage! The swing out section has been a massive pain, but we did complicate things by adding the gradient.
Post a Comment