New Post

Rss

Thursday, 22 July 2010
Platoon 7-1, Squad 7-1-4

Platoon 7-1, Squad 7-1-4

Continuing with the rest of 7-1 Platoon, next up is Squad 7-1-4. Yesterday I showed off Squad 7-1-3 here so today is another squad.

I had planned on having a third squad finished by tomorrow, but I haven't quite finished all the squad yet, and then I'm off on holiday on Saturday so they'll just have to wait.

So without further ado, here is Squad 7-1-4.


As with the previous post, there is one photo of the front and one of the back. Somehting I didn't mention is that the squad number is hand painted onto the left shoulder and the Cadian Gate logo on the right shoulder is a decal. I've also been experimenting with MicroSet and MicroSol, and so far I'm impressed. Soon it will be tested on some vehicles :).


2 squads done, 1 so nearly finished, only another 2 to go, but they will definately have to wait a while as I intend to do the command squad first (hopefully). Thanks for reading and feel free to leave comments and suggestions.
Wednesday, 21 July 2010
Platoon 7-1, Squad 7-1-3

Platoon 7-1, Squad 7-1-3

My slow painting has finally produced some results, so this will be the first post of several showing the completed squads.

The first of these squads is 7-1-3. There will be squads 7-1-0, 7-1-1 and 7-1-2 as well, but so far only 7-1-2 is completed, I'm just waiting for the shoulder transfers to dry. 7-1-0 will be the company command squad and 7-1-1 will be the "grenadier/veteran" squad and will have the different camo that I trialed.

So here are the photos for 7-1-3. Please note that this squad hasn't been sprayed with matt varnish yet due to the brilliant English summer, and the missus refuses to let me spray indoors.

I used Photoshop to arrange the pics all nice and neatly. I did find that my new camera is quite smart whilst taking these photos, the face detection ability even worked on them!


Pretty self explanitary, the above photo is a front facing shot and the photo below is the rear facing shot. I think I got all the models in the same order for both photos.


Squad 7-1-3 reporting for duty then. Squad 7-1-4 are just having their photos done and will be posted soon after these guys. As always comments and suggestions are appreciated. Cheers.
Saturday, 10 July 2010
Reinforcements have arrived!

Reinforcements have arrived!

So once again it's been a while since my last post. I promise you that I have done some painting since then. The infantry squad I was working on is finished so I just need to get some decent photos of them - I got a new camera which I'm still fiddling about with.

In the mean time, I got a nice little delivery of items from Maelstrom Games - used one of their discount vouchers!


In my lovely little order I got:
1 x Valkyrie - can't wait to build this!
1 x Shadowsword - need to get some bits for a conversion I want to do
1 x Demolisher/Executioner/Punisher - magnets to be tested on this
1 x Chimera - another conversion to be done hopefully
1 x Chaos Black Spray
1 x Hobby Drill - so I can finally drill out gun barrels!
and a load of little magnets.

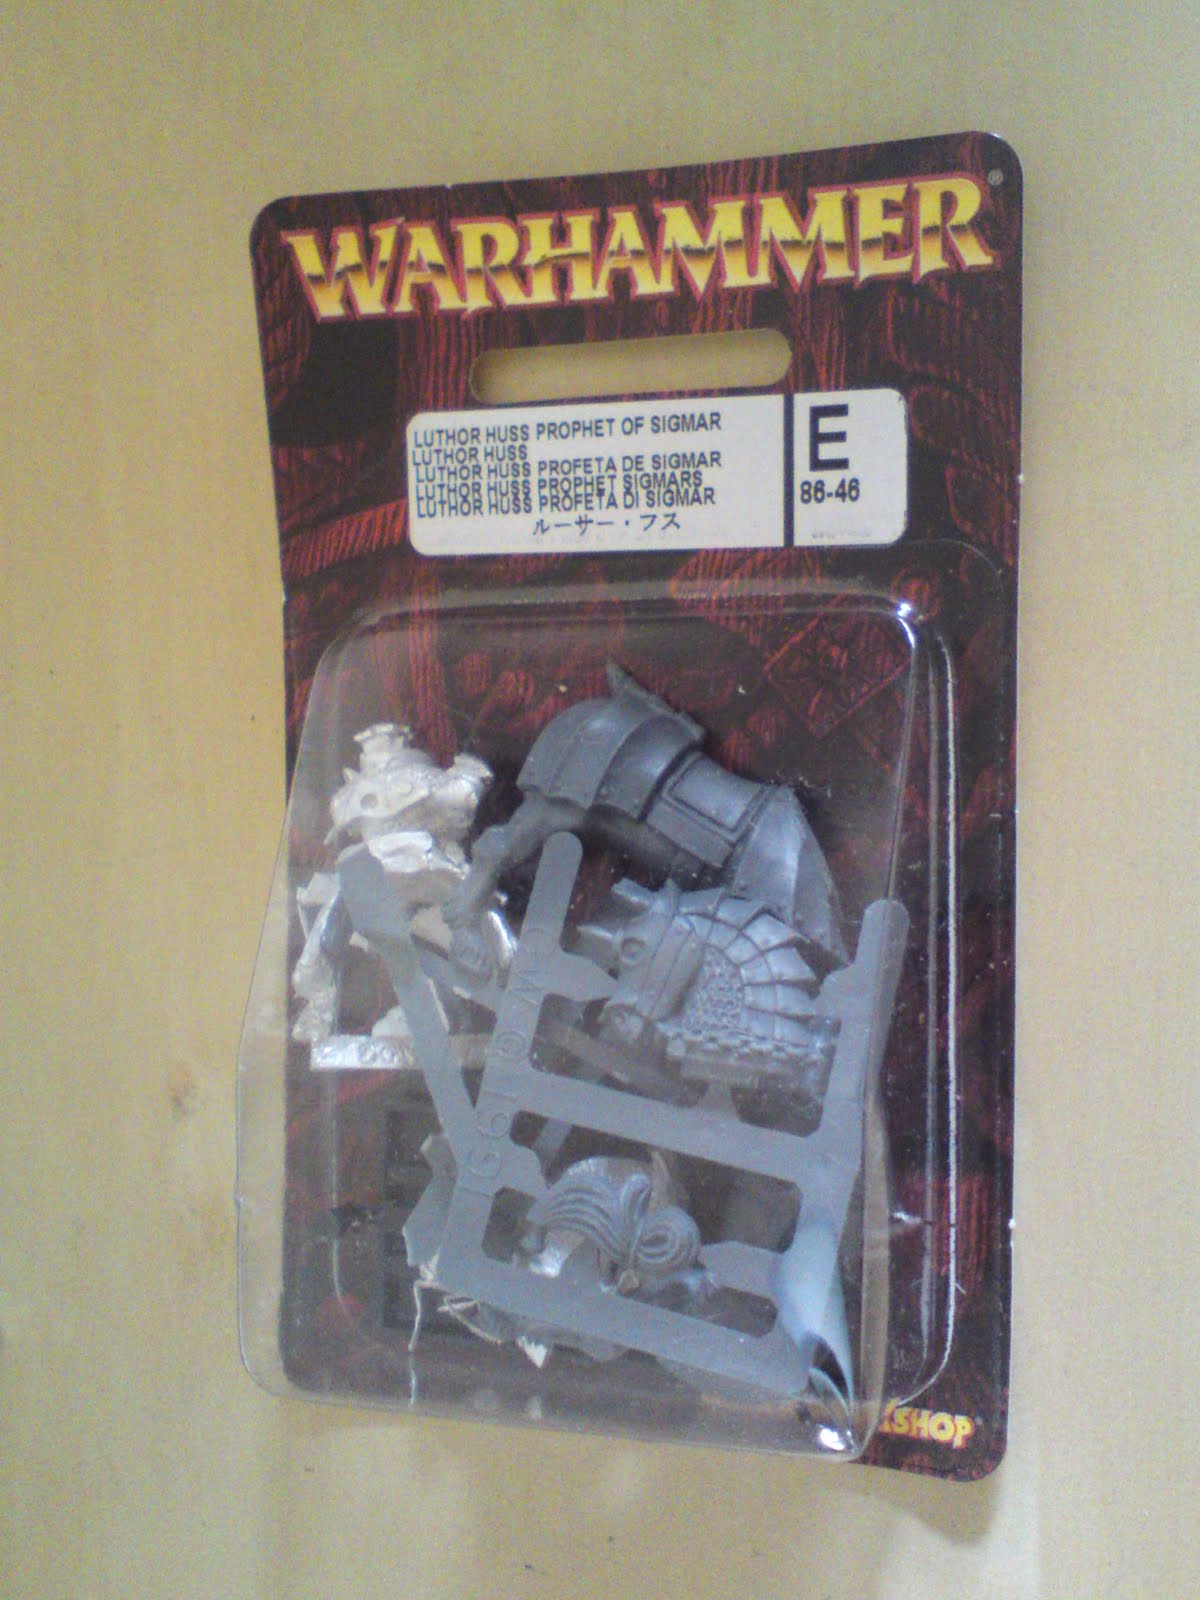
I thought I'd also leave you with some shots of my WIP Empire army. Most of this is still in boxes but I'm hoping that it'll provide motivation when I can't be bothered to paint guardsmen.


Basically its the combination of a couple of army deals. It should all add up to:
1 x Empire General - not shown here and already finished!
1 x Kurt Helborg
1 x Luthor Huss, Prophet of Sigmar
30 x Flagellants
20 x Free Company/Militia
? x Swordsmen/Halberdiers - don't know how many I've got as I didn't count the sprues
? x Handgunners/Crossbowmen - like above, don't really know how many I've got
15 x Outriders/Pistoliers
16 x Knights - although I think I have more
2 x Cannons/Mortars
1 x Hellblaster/Rocket Battery

I'll leave you with that feast of models. Until next time, thanks for reading!
Monday, 17 May 2010
Infantry Camo Scheme - two choices

Infantry Camo Scheme - two choices

Ok so whilst painting up the latest infantry squad to be added to my army, I thought I'd try something different. My usual paint scheme for the models is Snakebite Leather clothing and Goblin Green for the armour, with Graveyard Earth camo pattern added to the armour. This can be seen in the picture below, which will be named scheme A.


The something different scheme, which will be scheme B, is only very slightly different to A. All I've done is add a small line or blotch of Bleached Bone to the existing Graveyard Earth camo. Scheme B can be seen below.


So far I think that I prefer scheme B, but I've already got 4 squads painted up in scheme A, 2 squads with grenade launchers and 2 with flamers. I've got a couple of ideas of what I want to do but would like some of your thoughts on it.

My first idea is to continue painting my squads in scheme A and use B for my veteran's and Stormtroopers.

My second idea is to paint any squads in the future using B.

Third idea is to add the Bleached Bone camo onto the models with the special weapon and move the squads around. So basically I'll have 4 squads in scheme A, all with the same special weapon and then the rest of the squads in scheme B. This one is a bit more complicated and I'm not sure if I've explained it properly.

I did consider addding the Bleached Bone camo onto the original squads, but I think this may be more trouble than it's worht. Please let me know what you think about these ideas. Cheers.
Monday, 26 April 2010
Regimental Command Squad - "Atten-shun!"

Regimental Command Squad - "Atten-shun!"

"Atten-shun!"
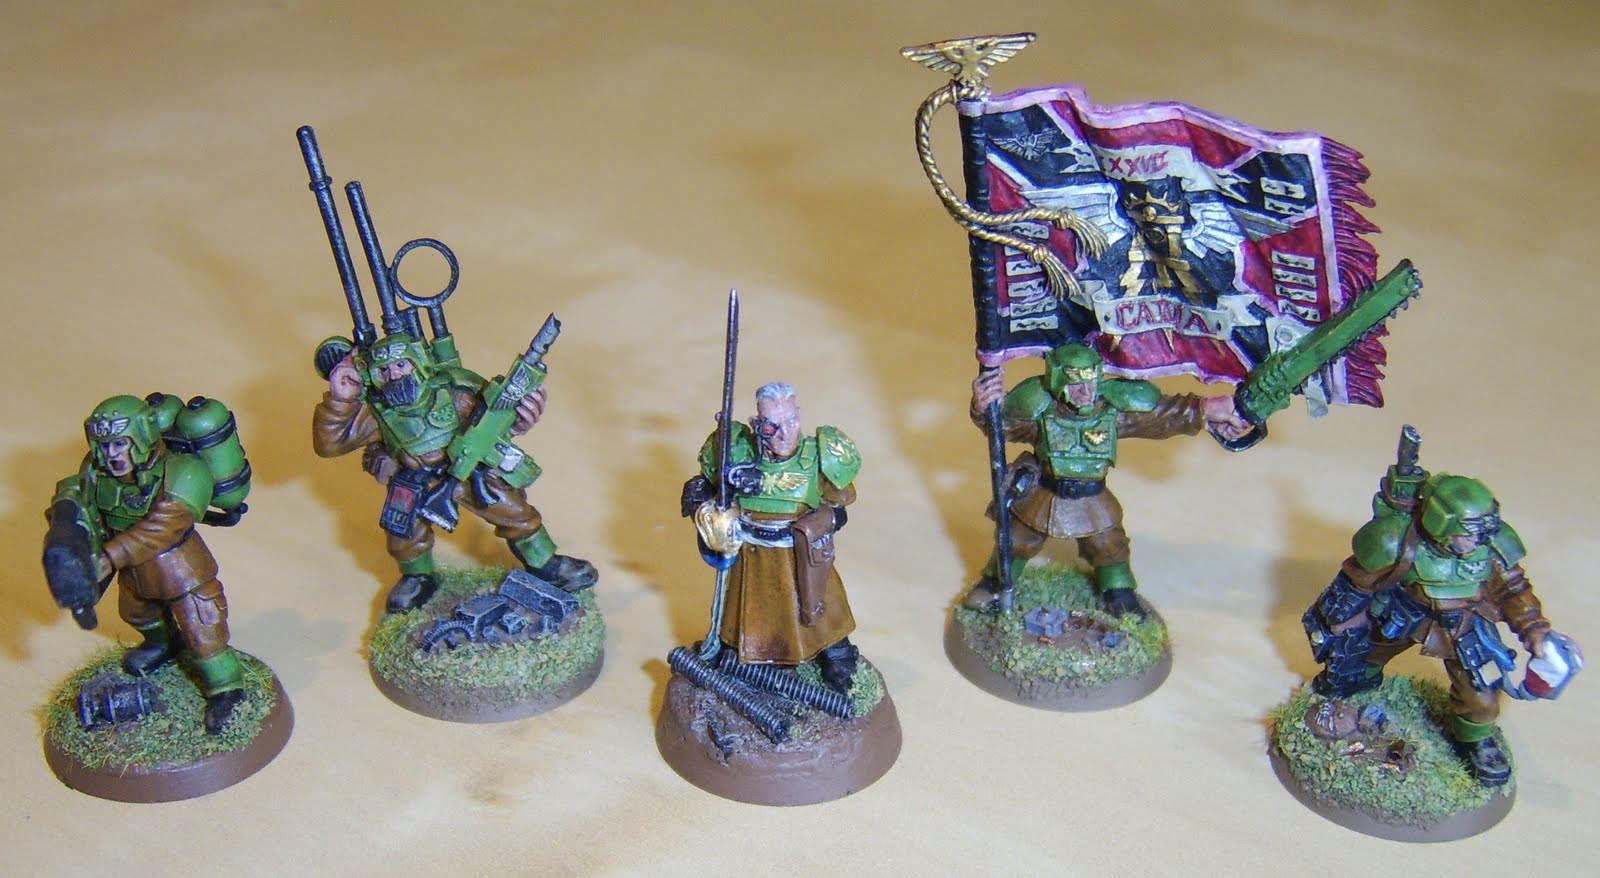
It's taken me several years but my Regimental Command Squad (RCS) is finally finished. It's taken me so long as I just cannot stand painting metal models. I like being able to paint the different sections of a model and then put it together. But I had to get these models done, so here is a nice group shot of them.


From left to right is: Guardsman with Heavy Flamer, Guardsman with Vox Caster, Senior Officer, Guardsman with Regimental Standard, Medic.
The heavy flamer guardsman is the plastic model from the new Command Squad box set.


I've put a couple of photos of each model up as there seemed to be something wrong with each one that I took. In some the facial detail wouldn't show but something else would. So I'll start with the Commanding Officer. I had mentioned him in a previous post here and but he deserves a second mention.


Next up is a guardsman carrying the Regimental standard - wonder how long this guy will last in a battle :S. This is the special edition model that came with the huge Cadian box set when they first came out. I'm in the process of coming up with a backstory behind the pinkness of the banner so await a little bit of fluff there.


No command squad would be complete without some comms, so here is the Vox Caster. Originally meant to be representing a Master Vox, but then the new codex came out so meh. I was going for a pose which suggested this guy was taking a breather while listening in to some comms chatter. All of the command squad got an extra piece of scenery on their base. This also makes them appear larger on the battlefield as they area couple of mm higher than the rest of the troops.


I love the smell of promethium in the morning! And what better way to deliver that flaming death than with a heavy flamer. This guardsman is made up from the bits out of the plastic Cadian Command Squad box set. I did encounter one problem with him, and that was the hose from his heavy flamer didn't reach the tank on his back, probably my fault with the way I posed him. Oh well, a little green stuff later and problem solved. I don't know if you'll be able to see it in the picture but I chose the head with the cigar in it's mouth, and painted the end a faint red, as if he'd just taken a smoke.


Finally we have the squad medic. This guy was actually quite fun to paint in the end. I did run out of ideas for the colours for his medical instruments but they turned out well.

So thats the RCS ready to lead the valiant troops of the 127th in to battle! And now to get some more troops enlisted in the 127th. Until next time, thanks for reading.
Sunday, 18 April 2010
613 "Tundo ab Redemptio" (Anvil of Redemption) - EFTC

613 "Tundo ab Redemptio" (Anvil of Redemption) - EFTC

Well the third tank is complete for the EFTC. When I say complete I really mean it just needs a spray coat of matt varnish, but I've run out and can't be bothered to order any more at the moment, but I don't think it'll make much difference in how the tank appears in the pictures. Although hopefully when it is sealed the turret numbers won't be so shiny. I've also got a new camera phone which is what these photos have been taken with so apologies if they suck.


"Tundo ab Redemptio" (Anvil of Redemption) is the third tank in the first squadron in my EFTC, and so completes this squadron. She is also the sister tank to "Marcus ab Morsus" (Hammer of Pain), so I know have "Hammer" and "Anvil" :). I again painted the name and designation on freehand on the underside of the hull. I think that my freehand is starting to come along quite nicely, practice is helping.


Some more shots of the side and front of the tank. I got a bit lazy when it came to some parts of this tank. For example the sponson weapons, I just couldn't be bothered putting multiple layers of Goblin Green on followed by Camo Green highlights. So they just got a Knarloc Green coat and then the same Bleached Bone drybrush as the rest of the tank.


A pic of the back of the tank and a top down view. The two backpacks on the left tracks are from the Cadian Heavy Weapon sprue. Had lots of them lying around so figured why not put them to good use. I also added a ForgeWorld piece onto the right of the tank in the storage section. They are labelled as Heavy Bolter ammo boxes, I just had to add some bits of sprue to the bottom of them to stop it falling into the storage bin.


These final shots are just some close up detail ones. The picture on the left shows the crewman gunner, or should I say dead crewman gunner. I didn't want all the crew looking like similar copies of each other, so had an attempt at modelling this dead guy. I just used the standing legs from the tank accessory sprue, with the body and then a set of arms. The head is from the Cadian troops box. For the bullet wounds, I just used my knife and dug out some crude holes. Then I painted Tallarn Flesh into the wounds, followed by Mechrite Red. Small amounts of Red Gore and then Blood Red were lightly brushed on. I tried to put a little more detail into his face and actually painted his mouth and teeth, then added a little dribble of blood down his face. The sceond picture is just of the backpacks, showing how Devlan Mud can make even my paintjobs look good.

I'm not expecting to have any of the other tanks finished soon as I'm currently finishing off my Regimental Command Squad, so stay tuned for some infantry! Cheers for reading.
Wednesday, 3 March 2010
612 "Marcus ab Morsus" (Hammer of Pain) - EFTC

612 "Marcus ab Morsus" (Hammer of Pain) - EFTC

As promised here is the next completed tank for my EFTC. This tank is designated as 612, 2nd tank of 1st squadron of 6th company, and has been named "Marcus ab Morsus" by her crew. This translates to "Hammer of Pain".


Once again I put my freehand skills to the test on the bottom of the model, to get more practice and for ease of identification.


I'm going to go into a bit more detail about this tank as it hasn't really been covered in any previous posts, other than it's turret. As with the previous tank, 612 got a heavy drybrush all over the model with Bleached Bone. However, I wanted to experiment with mud a little. Now I've read a few articles on doing mud, and I didn't feel ready to jump into using the PVA mixed with static grass mixed with something else method (maybe on another project). So instead I just went with drybrushing a muddy colour onto the lower section of the tank. The left picture shows the tank before this drybrush was applied and the right picture (as well as some of the following pics) show it after the drybrush. I started off with a heavy brush of Calthan Brown to get the initial level of grime, then a lighter drybrush of Graveyard Earth and then a very light brush of Snakebite Leather were applied. Overall I'm very happy with the results so on to the next pics.


As you can see from the picture above on the left, I also applied the mud drybrush over the tracks and tried to apply a heavy amount on the track guards where the tracks pass under. The tracks themselves received a bit more treatment than normal. I started by giving them an undercoat of Chaos Black. This was followed by a drybrush of Boltgun Metal, then Mithril Silver and then Burnished Bronze. The "mud" coat was then I applied. I also used this method for the grills under the sponsons and also the engine cover on the back of the tank. The end of the battle cannon barrel also got some extra treatment, with a heavy drybrush of Chaos Black and a light wash of both Devlan Mud and Badab Black to simulate firing powder burns.


A few more pictues, which show off the extra equipment I placed on the tank a bit better. On the left side of the tank I added a pick axe and shovel to the track guards. The right side got a compact lasgun on the back of the sponson and also a ForgeWorld piece, the tube thing on the back. No idea what this is actually for. Several fuel cans were added in the stowage rack, altough they look a bit too neat. I also aded the fuel drum to bulk the back out a bit. More can be seen of the "mud" effect on the tracks etc. I used the same method for the exhausts that I'd used on the battle cannon. Things were looking a bit too clean on the engine.


These last two pictures are just close ups to show some of the extra detailing I did. The crewman popping out the turret is made up of FW Cadian crew body and the head from the Cadian sentinel kit. I'm really happy with how his goggles turned out and it's probably the best representation of a reflective surface I've done. A bit like the fuel cans in the storage rack, I'm not entirely happy with my placement of the compact lasgun. Although it looks good overall, unless the crewman jumps from the hatch quickly, someone is likely to steal it as the tank is driving along. Oh well.

So that is "Marcus ab Morsus" completed. Hopefully I'll have this squadron finished very soon, only one more tank to do! And then it'll be onto the next three. Thanks for reading and as always comments are welcome.
Tuesday, 2 March 2010
611 "Auctorita" Take 2 - EFTC Squadron Command Tank

611 "Auctorita" Take 2 - EFTC Squadron Command Tank

Sorry for the long winded title to this post, but it's the only way of describing what is to follow. A long time ago I posted some WIP shots of one of the squadron command tanks for my EFTC. Those of you who haven't seen it can take a look here. Now this tank has been listed under my "Recently Completed" title on the right of my blog, which is technically a mistake as it was still a WIP. I am however now pleased to bring you the fully completed model (it's even been varnished!). Tada!


First of all I'm sure you are all amazed at my freehand brilliance. In case you can't tell freehand is not my strongpoint, but everyone has to start somewhere, so I started where nobody will ever look - on the bottom of the tank. Having 12 Leman Russ variants provides some problems when transporting them anywhere, surprisingly enough. With all those turrets and main body's packed away I wanted to be able to quickly match up the right sections. So I took out a brush and some Codex Grey and carefully painted the name of the tank and also the tank ID number on the bottom. Even I was amazed at how crummy my first attempt was, but it has taught me a couple of things regarding planning of text etc. About the only good point would be that the skull doesn't look to bad. Anyway on to the tank itself.


I'm not going to go into too much detail of how I painted this tank as I've covered it in previous posts. All I've done to finish this tank off is to apply the turret transfers to identifiy the tank and the Cadian gate transfers to the sponsons. I also finally got around to protecting the tank with two light spray coats of matt varnish.


I've tried to add extra bits of equipment without making the tank look overcrowded. The compact lasgun on the rear section makes me think that someone was quickly grabbing something from the storage locker and placed their gun on the top while they found what they were looking for. The HK missile received a wash of Badab Black to dull it down, as the Boltgun Metal drubrush was a bit bright.


The weapons all got highlighted with Camo Green and then a pretty heavy wash with Devlan Mud like all the one's I built recently (sort of). The crewman also got the Devlan Mud treatment, unfortunately he's out of focus but at least you can see the hatch behind him clearly. I'll be working on my photography skills as well as those freehand ones. And that is "Auctorita" 100% completely finished! Now that I've got one of these tanks fully done the next one does not seem as daunting. To be honest it's already finished, but I'll post the pics of 612 "Marcus ab Morsus" (Hammer of Pain) tomorrow. So until then, thanks for reading everyone.
Monday, 15 February 2010
EFTC Cont. Part 8

EFTC Cont. Part 8

The transfer fun continues at pace now, and it's time to do the turret markings. I followed the same approach as normal when I'm doing transfers - couple of layers of 'Ardcoat on the surface I'll be applying the transfer to. Once I had all of the transfers cut out (there were a lot!) I began to carefully apply them to the turrets. I only applied one transfer to each turret at a time so that I wouldn't mess up the previous transfer. This also meant that I got them done quite quickly, thankfully.


So set of pictures above and below show me adding the transfers in order to one of the turrets. The first number denotes the company, the second number is the squadron and the third number is the tank number. For the squadron command tanks, I used a skull just for something different.


Once all of the transfers had been applied and left for a few hours, I put another layer of 'Ardcoat over them for added protection. The picture above is the company command tank's turret and I decided to use a random transfer for the command designation. And now pictures of every turret in the company. Enjoy!


Squadron 1:
Command Tank 611
MBT 612 and MBT 613


Squadron 2:
Command Tank 621
MBT 622 and MBT 623


Squadron 3:
Command Tank 631
MBT 632 and MBT 633

So now that I've got all of those transfers done I can finally get around to damaging and weathering. I'll be doing each tank individually so I'll try and keep them different. Oh I have decided that the next time I use transfers I'll get some MicroSol/Set. Please leave comments and suggestions if you want. Thanks.
Copyright © 2012 Cadian 127th Regiment All Right Reserved